Prerequisites
- Visual Studio 2019 – Download
- Visual Studio 2019 Workload: .NET Core Tools – .NET Core cross-platform development
- .NET Framework 4.6.2 Developer Pack – Download
- VMware Player OR Workstation VMware Player is free, so that is recommended instead – Download
Installing Cosmos
First, you need to choose between the User Kit and the Dev Kit. It is recommended that new users start with the User Kit but move later to the Dev Kit.
The Dev Kit is the live source against which the Cosmos Team develops directly. The Dev Kit has the latest and greatest features, but at various times has known issues, and sometimes may not even build. Thus to use the Dev Kit be sure to join our support channels and inquire about the current status before using the Dev Kit or updating it.
The User Kit is a snapshot stable version of Cosmos including a premade installer. The UserKit however is often quite a bit out of date compared to the DevKit and is only occasionally updated. The User Kit is a great easy way to get familiar with Cosmos, but active developers should transition to the Dev Kit after becoming very familiar with the UserKit, and expect some bugs here and there.
User Kit
- Download the latest release of Cosmos (download the exe file)
- Wait for the download to complete then run the installer. Allow it to run as admin. Make sure VS2019 is NOT running when you do this.
- Click “Next” then “Install”
- Wait for the install to progress. Tip: At the end the installer may look like it has stalled, but it is still doing something in the background. WAIT for the “Finish” button to become available.
- Cosmos should now be installed. Follow other tutorials to find out how to create your first OS.
Dev Kit
Additional Prerequisites
- Visual Studio 2019 Workload: Visual Studio Extension Development
- Inno Quick Start Pack (Free) – Install with defaults, keep Preprocessor option checked Download
- .NET Core 2.0 SDK – Download
Get the Source
Cosmos source is hosted at GitHub. The simplest method to obtain the source is download a .zip file, however this makes updating and getting the latest updates a bit tricky. For easier updates use the Git command line, or any of the many Git User Interfaces. Any frontend may work fine but for users new to Git, we suggest GitHub Desktop. For more experienced Git users, we really like Git Kraken. Git Kraken is free for non-commercial use such as Cosmos. SourceTree, Git GUI, and others are also available.
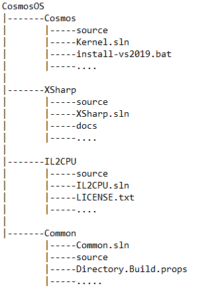
For better encapsulation and to invite more developers to assist in various areas Cosmos is split into four Git repositories. Each of these is designed to be an independent project although Cosmos relies on the other three. You will need to pull the source for all four repositories and they must exist in sibling directories as shown in the diagram below.
The Cosmos base directory can be named anything and exist anywhere. But the directories inside it must match exactly. Windows is not case sensitive for files, but many of the .NET Core tools used to build are case sensitive even on Windows for file paths. Make sure to create the subdirectories exactly as shown.
For demonstration purposes let us assume that you will use c:\source\Cosmos to install to. This base directory is referred to as the Cosmos directory. Each of the four repositories then must be cloned or extracted to the corresponding sub folder of the Cosmos directory. Using this example, the set up should look like this:
c:\source\CosmosOS\
c:\source\CosmosOS\Cosmos\ – Git Repository for Cosmos
c:\source\CosmosOS\IL2CPU\ – Git Repository for IL2CPU
c:\source\CosmosOS\XSharp\ – Git Repository for XSharp
c:\source\CosmosOS\Common\ – Git Repository for Common
A tree diagram of the source should look like the following:

We are working to make syncing code easier. We have already experimented with Git Submodules, however the simple use of submodules presents a few issues, but the biggest of them is that they trigger a fireworks show of problems and errors in every Git UI we tried and would have limited developers options and forced them to the command line in most cases. We are currently investigating subtrees. For now, it’s much easier to handle the 4 repositories as most of the time, new Cosmos developers may only have to work in the Cosmos repository. Only when you are comfortable with the concept of Operating System development and C# should you venture into IL2CPU and XSharp.
If you want to keep your source up to date in a one-click method, paste this code into a .bat file in the CosmosOS folder ( as shown in the above example). This .bat file will only work after the repositories have been cloned with git at least once.
cd C:\XSharp
git pull
cd ..\IL2CPU
git pull
cd ..\Cosmos
git pull
cd ..\Common
git pull
cd ..
Building and Installing
(if you have already installed) If you edited the Cosmos DevKit source using Cosmos.sln or Test.sln, be sure to set solution config to Debug x86.
- Make sure Visual Studio is NOT running.
- In the root directory of the DevKit files, you downloaded earlier, run
install-VS2019.bat. - Wait for the install to progress. (Tip: At the end the installer may look like it is stalling, it is still doing something, just in the background)
- VS will open with Cosmos loaded. You can now make changes to core assemblies of Cosmos. If you don’t want to, you can close this VS window and create a new Cosmos project as with the user kit.
